
SUBSCRIBE.
Sign up for my newsletter. Filled with blogs, discounts, events and other news. 1 – 2 per month, max.
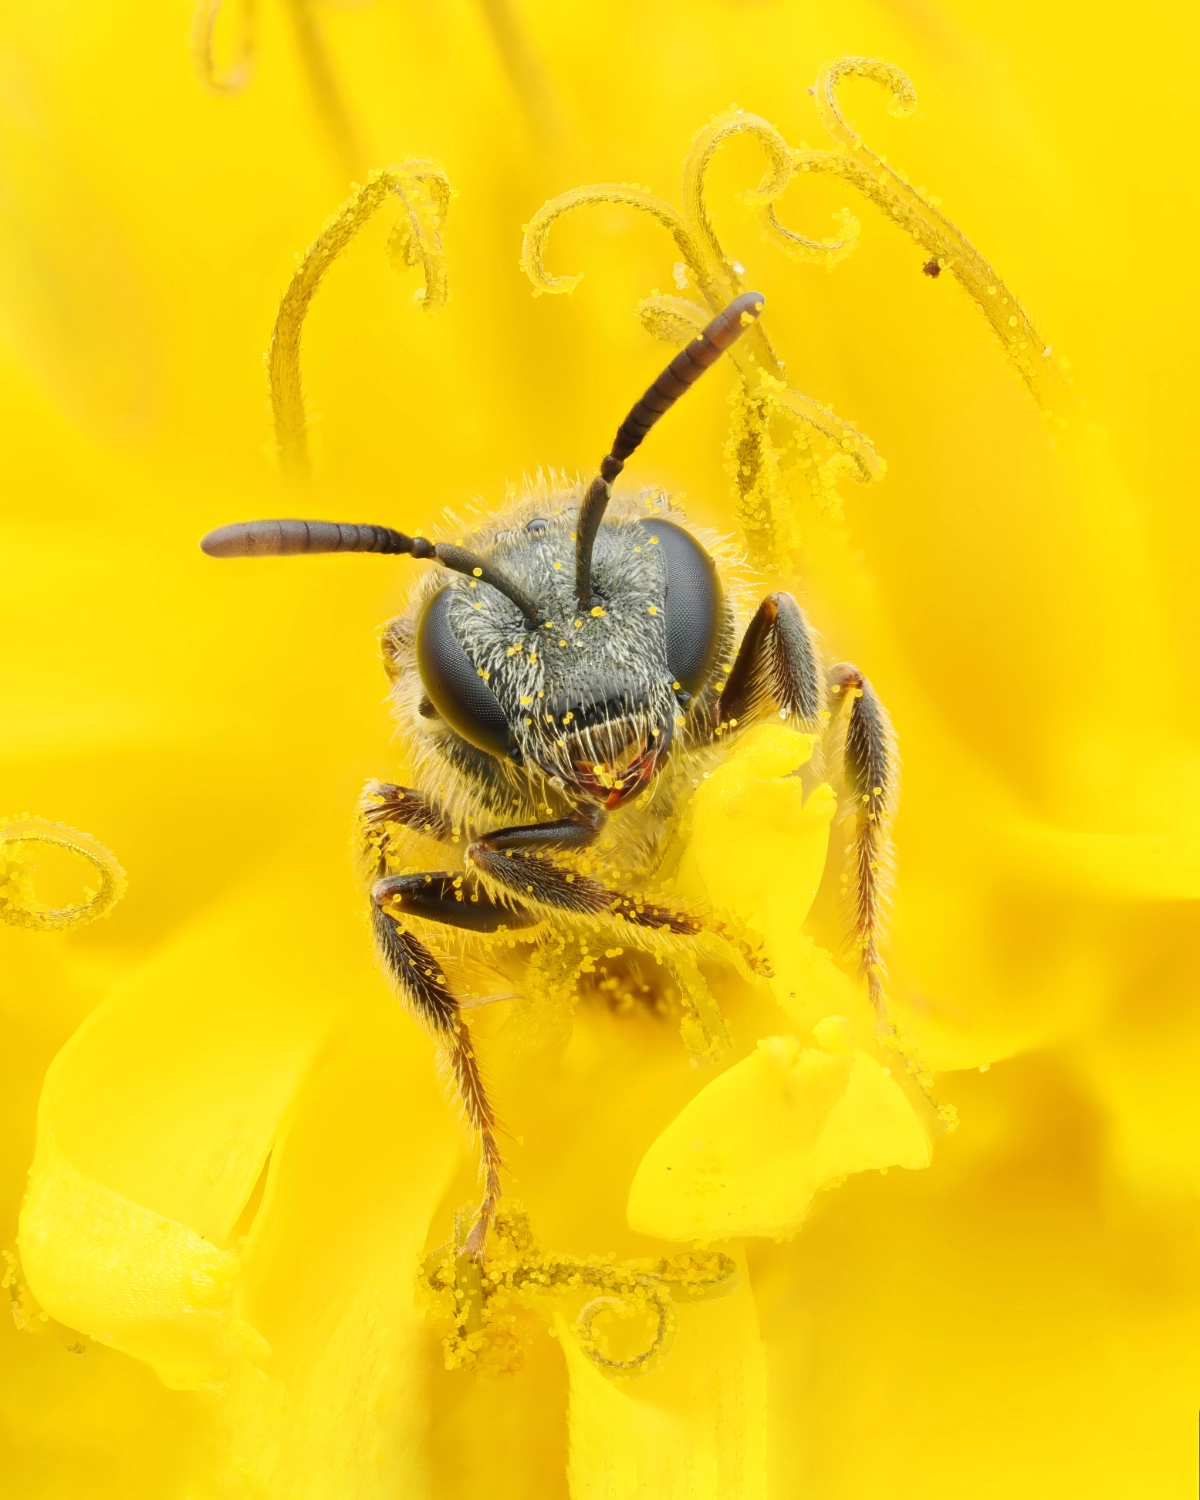
So, Marit, how do you take these photos? It’s a question I get often, and the answer is not a short one. It might look easy in reels, but it’s only a small part of the story. It’s why I want to share with you a full workflow. From start to final edit.
It was one of those slow macro days. Early April, a little sunshine, but still a cold wind. The kind of weather that keeps insects active, but just not quite still enough for a portrait. While walking through my garden in Deurningen, I came across a few promising species, but they were all moving too quickly to work with.
I saw several wild bees and hoped one would settle long enough for a photo, but most of the males were far too busy chasing the next chance to mate.
After a few hours, I still didn’t have a proper portrait. But that’s part of the game. I don’t really mind it. I’m outside, observing, and enjoying the process. If a portrait happens, great. If not, that’s fine too.
Then I spotted two tiny black insects in a dandelion. They looked like little bees, but they were so small it was hard to tell for sure with the naked eye.
They turned out to be a very small species of furrow bee. Females. They were feeding, and every now and then they paused for just a moment. Enough for me to finally get my chance.
Now that I had found my subject, it was time to get my gear into position.
For this shot, I used my 90mm Zuiko, OM-1 Mark II, Godox V860, and AK diffuser. If you want the full list of my favourite gear, you can find that here.
Before heading out, I made sure my batteries were charged. I also keep a simple charging station setup at home, which makes that part much easier. And, just as importantly, I checked that my SD card was empty and already in the camera.
I also have a custom button on my camera where I saved my favourite focus stacking settings. If you want to know more about those settings, you can read about them here.
My base settings for this shot were 1/80 F9 ISO200 with flash set to 1/128. For this scene, I increased the ISO to 400 because I needed a little more light. I also boosted the flash to 1/64 for the same reason.
After a few test shots, the brightness and colours looked just right. I also had my zoom at maximum (2:1), since the bee was only about 6 mm long. Her head was roughly 2 mm wide, so this was a very small subject to work with.
This dandelion was growing very close to the ground, so I had to lie flat on my stomach to get into position. Thankfully, the bees kept feeding without paying any attention to me. That makes it much easier to get close without disturbing them.
Now came the tricky part. I carefully grabbed the stem of the dandelion and tilted it slightly to improve my angle. I had a clear view of one of the bees, but she was still cleaning herself and moving around, so I waited for her to settle.
When she finally stopped moving, I gently lifted one tiny petal of the dandelion to see if she would shift into a better position. She did, and suddenly she was sitting in the perfect portrait pose.
I quickly took a series of frames from different angles: from the front, from the side, and again from the front with a few small variations. Each sequence usually gives me around 50 to 80 shots.
Some of those frames had a fully yellow background, while others included a bit of blue sky. I didn’t like the sky version at all, so those went straight into the discard pile.
Before wrapping up the session, I also like to make a few ID shots to help identify the insect later. I did take them, but in the end I removed them during the selection process. Oops.
I took about 1300 shots of this particular bee. That might seem like a lot, but remember that all of those are part of a focus bracketing sequence. Two portraits is 130 shots easily.. so if you want something to choose from, and make sure you have a least a few succesful stacks (hard to see while working with a live subject in the field) you better have some extra. No do-overs.
I’m very easy to toss. If a background looks lame or not the right colour, if there is too much movement: bin. Don’t look back. Why? Because my library is already stuffed as is, and any selection choices you make straight away, will save you tons of time later.
I think I can get 3 very nice portaits out of this one. But I will start with the one that looks most appealing to me straight of the bat.

I select all the images from a series, in this case 77 shots. Then open Affinity > File > New Image Process > Focus Merge.
And then Affinity will just do it’s thing, aligning and merging. If I did my field work correctly with a stead hand, it means I’m pretty much done. Just a few minor editing tweaks to ge to the finished file.
So once I get the desired portrait, I might make a reel out of it. I often bring my DJI Pocket with me (vlog camera), so I can quickly take some video footage of me working. My reels are mostly to give an idea of what it looks like in the field followed by a zoomed in final edit. This is the reel I made with the Furrow Bee Shot.
I don’t sell my images on stock websites, but I do have a list of clients that is often interested in licensing. So if I have a set of new work I think might be interesting for them, I will send them an overview with the new work.


Sign up for my newsletter. Filled with blogs, discounts, events and other news. 1 – 2 per month, max.